Imagine an enterprise developing multiple AI applications such as an AI Market Assistant, AI Incident Assistant, AI Sales Assistant, and AI Operations Assistant. If each application needs to access Elasticsearch directly, every team ends up implementing its own Elasticsearch client, authentication, retry logic, error handling, query generation, logging, and business rules.
The result is duplicated code, inconsistent implementations, higher maintenance costs, and slower feature development. This is exactly the problem that the Model Context Protocol (MCP) solves.
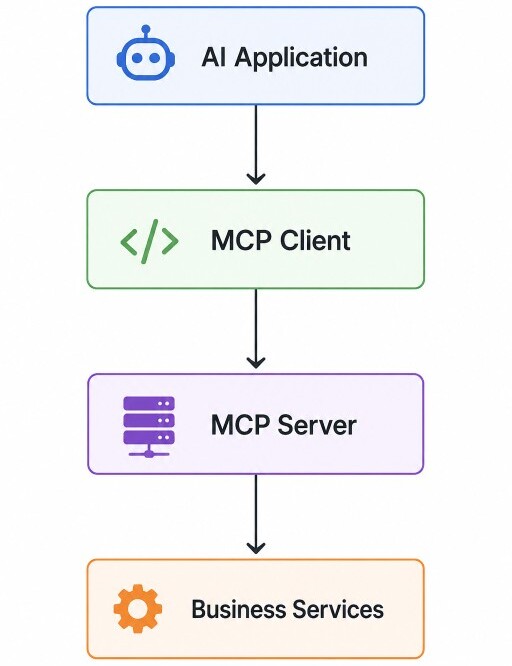
Instead of allowing every AI application to communicate directly with enterprise systems, MCP introduces a standardized communication layer.
In this article, we will build our first production-ready MCP Server using Python.
What is MCP?
Model Context Protocol (MCP) is an open protocol that standardizes communication between AI applications and external systems.Instead of every AI framework inventing its own function-calling format, MCP defines a common protocol understood by both AI applications and MCP Servers.
Think of MCP as the equivalent of REST APIs for AI applications. Instead of calling REST endpoints, AI applications invoke MCP capabilities.
An MCP Server can expose three different capabilities.
1. Tools: Tools perform actions or execute business operations. Examples include searching Elasticsearch, executing SQL queries, creating Jira tickets, sending emails, querying Redis, or generating reports.
Unlike traditional REST endpoints, MCP Tools are automatically discoverable by MCP-compatible clients, allowing AI applications to dynamically identify and invoke the capabilities exposed by the server.
2. Resources: Resources expose read-only information that AI applications can retrieve without executing business logic. Examples include documentation, knowledge base articles, configuration, business rules, API specifications, and other contextual information.
Unlike Tools, Resources are intended solely for providing information and should never modify data or perform operations.
3. Prompts: Prompts are reusable prompt templates that can be shared across multiple AI applications. Instead of storing prompts inside application code, organizations can centralize them inside an MCP Server.
Project Structure
Let's begin by creating a clean, production-ready project structure. Starting with a well-organized layout makes it easier to scale the MCP Server as new Tools, Resources, Prompts, and services are added.market-mcp-server/
app/
__init__.py
main.py
server.py
tools/
__init__.py
health.py
pyproject.toml
README.md
Installing Dependencies
Create the project.mkdir market-mcp-server
cd market-mcp-serverpython -m venv .venv
source .venv/bin/activate
pip install "mcp[cli]" fastapi uvicorn pydantic-settings
pip show mcp
Name: mcp
Version: 1.28.0
Creating the MCP Server
Create a new file. app/server.pyfrom mcp.server.fastmcp import FastMCP
mcp = FastMCP("Market MCP Server")
Creating Our First Tool
Now let's create a simple health check tool. Create app/tools/health.pyfrom app.server import mcp
@mcp.tool()
def ping() -> str:
"""
Health Check Tool
"""
return "pong"
@mcp.tool() decorator automatically registers the function with the MCP Server. Unlike REST APIs, there is no controller or routing configuration required. The tool becomes discoverable automatically.
Registering the Tool
Create app/main.pyfrom app.server import mcp
import app.tools.health
if __name__ == "__main__":
mcp.run()
Testing
Unlike a traditional FastAPI application, an MCP Server does not expose REST endpoints. Instead, it communicates with MCP Clients using the Model Context Protocol (MCP) over JSON-RPC.During development, the easiest way to start and test an MCP Server is by using the MCP Inspector, which launches the server, acts as an MCP Client, and provides a web-based interface for interacting with your tools.
Start the MCP Server
From the project root, execute the following command.npx @modelcontextprotocol/inspector python -m app.main
http://localhost:6274/?MCP_PROXY_AUTH_TOKEN=...
Connecting to the MCP Server
Initially, the Inspector displays the connection configuration.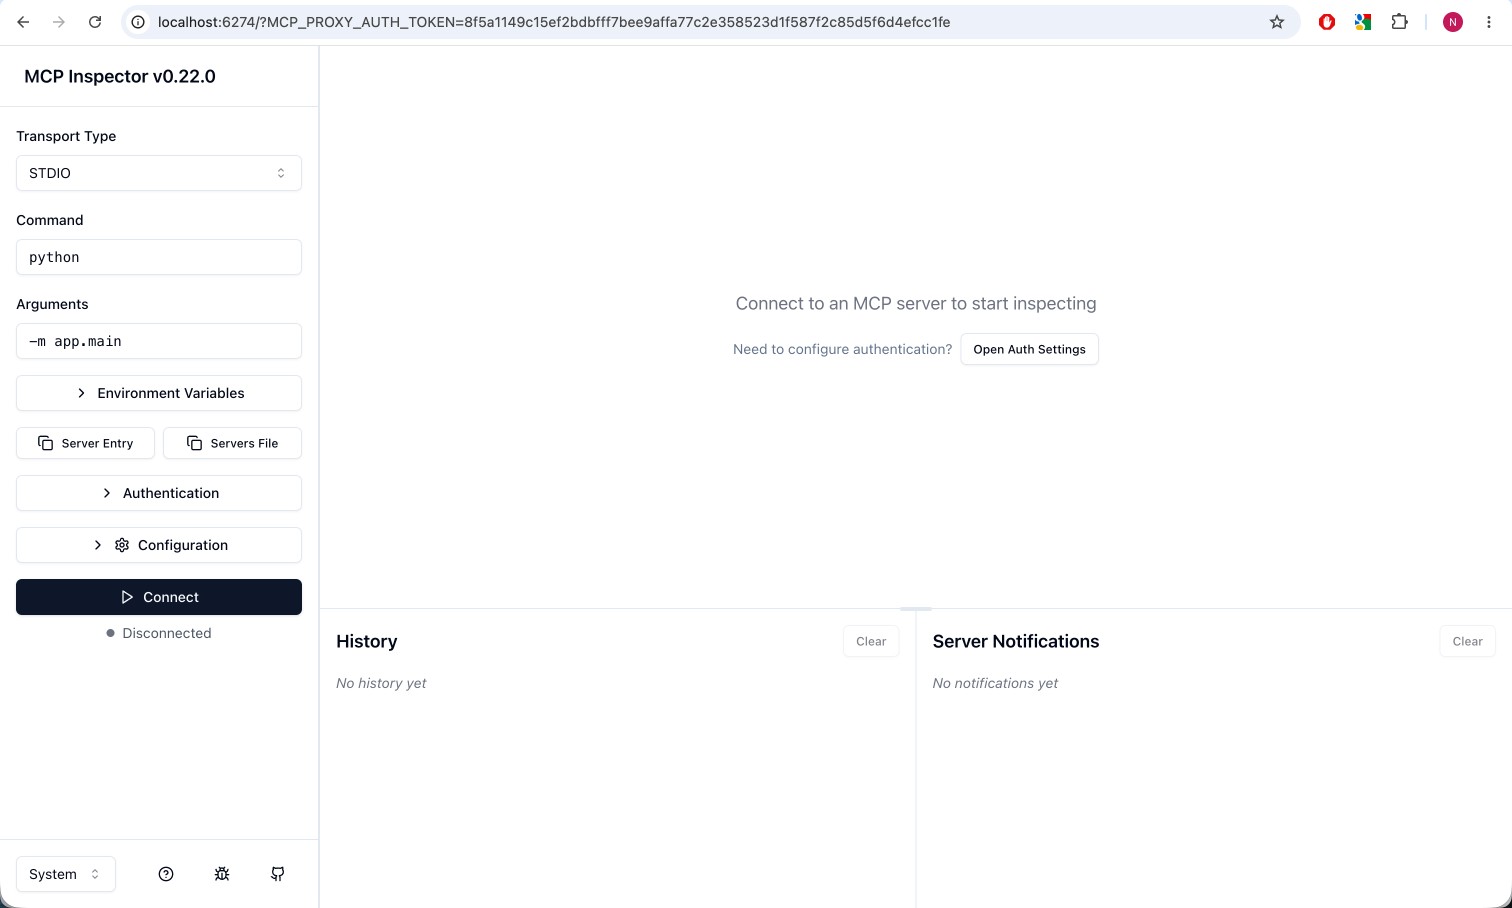
Discovering Available Tools
Once the connection is established, the Inspector automatically discovers all tools exposed by your server. Expand the Tools section.Select the
ping tool and click Run Tool. Since this tool does not require any input parameters, simply execute it without providing a request body. Expected response:
{
  "result": "pong"
}
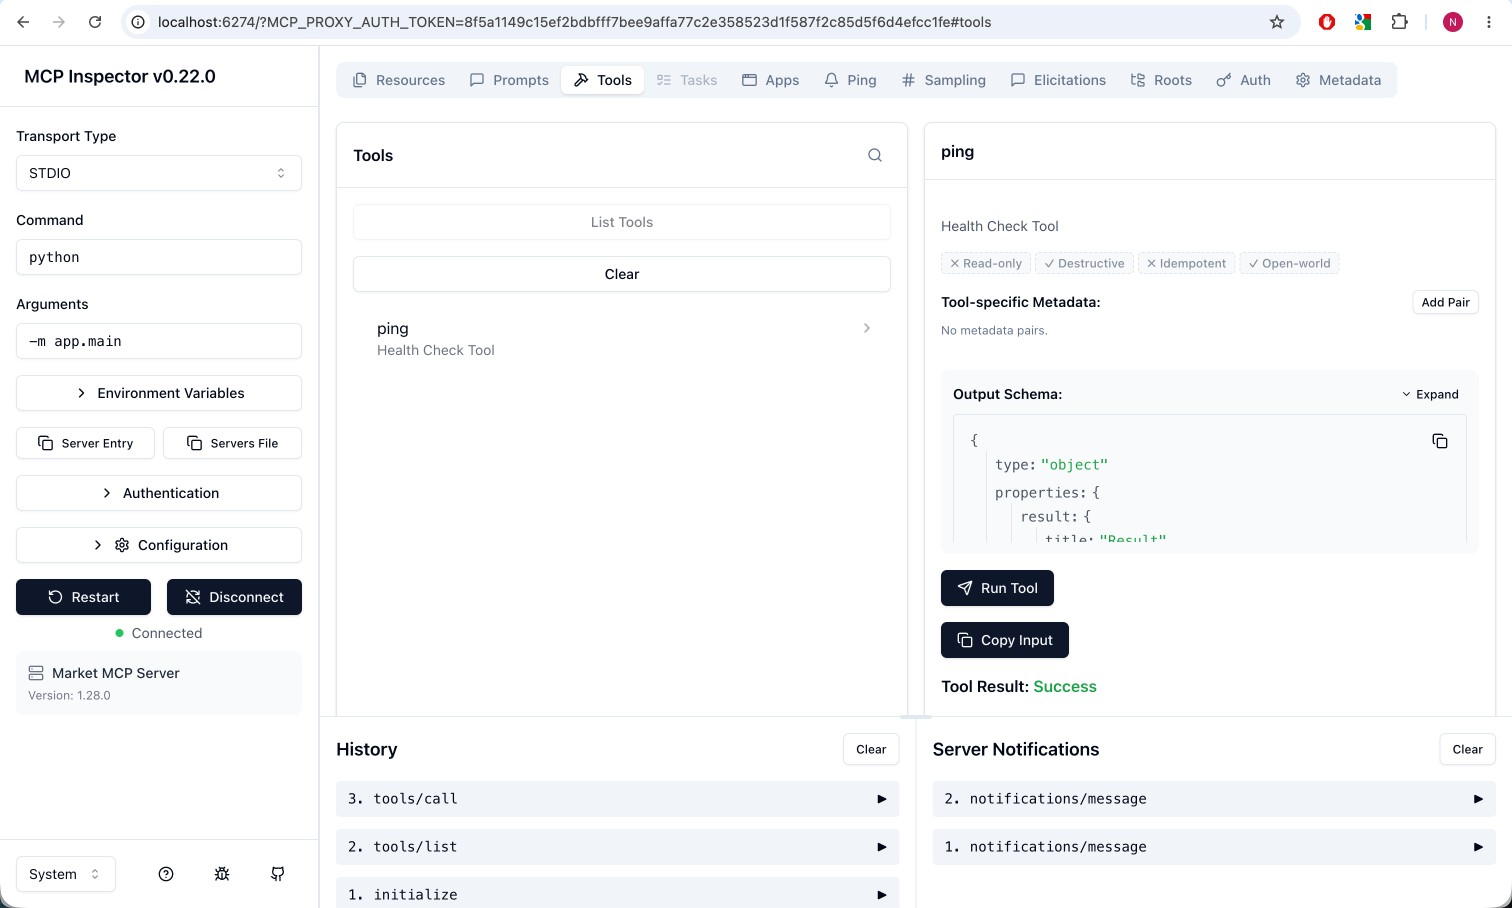
ping() tool was automatically discovered, and the request was executed successfully.
We have successfully built and tested your first MCP Server.
Elasticsearch with the MCP Server
In this section, we'll integrate our MCP Server with Elasticsearch. Rather than querying Elasticsearch directly from our MCP tools, we'll follow a layered architecture where each component has a single responsibility.Installing the Elasticsearch Python Client
Install the official Elasticsearch client.pip install elasticsearch
pip show elasticsearch
Updated Project Structure
Our project now grows slightly to accommodate Elasticsearch integration.market-mcp-server/
app/
├── main.py
├── server.py
│
├── elasticsearch/
│ ├── __init__.py
│ └── client.py
│
├── services/
│ ├── __init__.py
│ └── elasticsearch_service.py
│
└── tools/
├── __init__.py
├── health.py
└── elasticsearch.py
Creating the Elasticsearch Client
Create the following file: app/elasticsearch/client.pyfrom elasticsearch import Elasticsearch
es = Elasticsearch(
"http://localhost:9200",
request_timeout=30
)
Creating the Service Layer
Next, let's encapsulate Elasticsearch operations inside a dedicated service. app/services/elasticsearch_service.pyfrom app.elasticsearch.client import es
class ElasticsearchService:
def cluster_health(self):
return es.cluster.health()
Creating an MCP Tool
Now expose the service through an MCP Tool. app/tools/elasticsearch.pyfrom app.server import mcp
from app.services.elasticsearch_service import ElasticsearchService
service = ElasticsearchService()
@mcp.tool()
def cluster_health() -> dict:
"""
Returns Elasticsearch cluster health.
"""
return service.cluster_health()
Registering the Tool
Update app/main.py.from app.server import mcp
import app.tools.health
import app.tools.elasticsearch
if __name__ == "__main__":
mcp.run()
cluster_health() tool is registered with the MCP Server during startup.
Testing
Start the MCP Inspector.npx @modelcontextprotocol/inspector python -m app.main
{
    "cluster_name": "docker-cluster",
    "status": "green",
    "timed_out": False,
    "number_of_nodes": 1,
    "number_of_data_nodes": 1,
    "active_primary_shards": 36,
    "active_shards": 36,
    "relocating_shards": 0,
    "initializing_shards": 0,
    "unassigned_shards": 0,
    "unassigned_primary_shards": 0,
    "delayed_unassigned_shards": 0,
    "number_of_pending_tasks": 0,
    "number_of_in_flight_fetch": 0,
    "task_max_waiting_in_queue_millis": 0,
    "active_shards_percent_as_number": 100.0
}
ping() and cluster_health() tools establish the complete implementation pattern for building production-ready MCP capabilities.
Capabilities such as
list_indices(), search_documents(), hybrid_search(), semantic_search(), and market_summary() can all be implemented using the same layered architecture, where MCP tools remain lightweight entry points while all business logic, validation, and Elasticsearch interactions are encapsulated within dedicated service classes.
MCP Resources
Many applications need to expose static or dynamically generated information such as documentation, configuration, schemas, business rules, or knowledge base articles. For these use cases, the Model Context Protocol provides Resources.Unlike Tools, Resources are intended for reading information. They should not modify data or execute business operations.
Think of Resources as documents that an AI application can discover and read whenever additional context is required.
Creating Our First Resource
Create a new file. app/resources/about.pyfrom app.server import mcp
@mcp.resource("market://about")
def about() -> str:
return """
Market MCP Server
Version : 1.0.0
Environment : Local Development
Powered By:
- Python
- FastAPI
- MCP
- Elasticsearch
"""
@mcp.tool() decorator, we register the function using @mcp.resource(). Every resource is identified using a unique URI.
In our case, the URI is:
market://about
Registering the Resource
Update app/main.py.from app.server import mcp
import app.tools.health
import app.tools.elasticsearch
import app.resources.about
if __name__ == "__main__":
mcp.run()
Testing
Start the Inspector.npx @modelcontextprotocol/inspector python -m app.main
Expand the Resources section and select
market://about. The Inspector displays the resource contents.
{
  "contents": [
    {
      "uri": "market://about",
      "mimeType": "text/plain",
      "text": "Market MCP Server\n\nVersion: 1.0.0\n\nEnvironment: Local Development\n\nPowered By:\n- Python\n- FastAPI\n- MCP\n- Elasticsearch"
    }
  ]
}
Resources are extremely useful in enterprise applications because they provide additional context to AI applications without requiring tool execution.
MCP Prompts
In most AI applications, prompts are hardcoded directly into the application source code. For example, a LangGraph workflow or FastAPI service might contain prompts such as:- Generate an executive summary.
- Analyze campaign performance.
- Compare market trends.
- Explain KPI definitions.
As applications grow, the same prompts are often duplicated across multiple services, making them difficult to maintain and update.
MCP solves this problem by allowing prompts to be exposed as reusable server-side assets. Instead of every AI application maintaining its own prompt library, multiple applications can discover and reuse prompts directly from the MCP Server.
Creating Our First Prompt
Create a new file. app/prompts/market.pyfrom app.server import mcp
@mcp.prompt()
def executive_summary(region: str):
return f"""
Generate an executive summary for the {region} market.
Include the following:
- Revenue
- CTR
- Conversion Rate
- Top Performing Campaigns
- Key Insights
- Recommendations
"""
@mcp.prompt() decorator registers the function as an MCP Prompt.
Unlike a Tool, a Prompt does not execute business logic or retrieve data. Instead, it returns a reusable prompt template that AI applications can incorporate into their own workflows.
Registering the Prompt
Update app/main.py.from app.server import mcp
import app.tools.health
import app.tools.elasticsearch
import app.resources.about
import app.prompts.market
if __name__ == "__main__":
mcp.run()
Testing
Start the MCP Inspector.npx @modelcontextprotocol/inspector python -m app.main
Expand the Prompts section and select
executive_summary. The Inspector prompts you for the required input parameter.
region = US
{
  "description": "",
  "messages": [
    {
      "role": "user",
      "content": {
        "type": "text",
        "text": "Generate an executive summary for the US market.\n\nInclude the following:\n\n- Revenue\n- CTR\n- Conversion Rate\n- Key Insights\n- Recommendations"
      }
    }
  ]
}
By centralizing prompts within an MCP Server, organizations maintain a single source of truth, ensuring consistent prompt usage, easier maintenance, simplified versioning, and prompt updates without modifying AI application code.
Our MCP Server now exposes all three core capabilities defined by the Model Context Protocol.
Market MCP Server

├── Tools
│     ├── ping()
│     └── cluster_health()
│
├── Resources
│     └── market://about
│
└── Prompts
      └── executive_summary()
Connecting to an MCP Server
So far, we've built a production-ready MCP Server capable of exposing Tools, Resources, and Prompts. We've also integrated it with Elasticsearch and verified its functionality using the MCP Inspector.However, one important question still remains. How does an AI application actually use an MCP Server?. The answer lies in the MCP Client.
Just as a web browser communicates with a web server using the HTTP protocol, an AI application communicates with an MCP Server using an MCP Client.
Creating the AI Client
Inside our project, create a new folder namedexamples. We'll use the official MCP Python SDK to connect to our server. examples/ai_client.py
import asyncio

from mcp import ClientSession, StdioServerParameters
from mcp.client.stdio import stdio_client

async def main():
    server = StdioServerParameters(
        command="python",
        args=["-m", "app.main"]
    )

    async with stdio_client(server) as (read_stream, write_stream):

        async with ClientSession(
            read_stream,
            write_stream
        ) as session:

            # Initialize the MCP connection
            await session.initialize()

            # Discover available tools
            tools = await session.list_tools()

            print("\nAvailable MCP Tools\n")

            for tool in tools.tools:
                print(f"• {tool.name}")

if __name__ == "__main__":
    asyncio.run(main())
Running the AI Client
Execute the client.python examples/ai_client.py
[06/26/26 00:59:06] INFO     Processing request of type ListToolsRequest                                                                                                server.py:733

Available MCP Tools

• ping
• cluster_health
Invoking an MCP Tool
Now let's invoke our first tool. Replace the contents inside theClientSession block with the following code.
# Initialize the connection
await session.initialize()

# Execute the ping tool
result = await session.call_tool(
    "ping",
    {}
)

print(result)
python examples/ai_client.py
[06/26/26 01:01:11] INFO     Processing request of type CallToolRequest                                                                                                 server.py:733
                    INFO     Processing request of type ListToolsRequest                                                                                                server.py:733
meta=None content=[TextContent(type='text', text='pong', annotations=None, meta=None)] structuredContent={'result': 'pong'} isError=False
ping() tool exposed by our MCP Server.
Calling the Elasticsearch Tool
Invoking the Elasticsearch health check is equally straightforward.# Initialize the connection
await session.initialize()
# Call the tool
result = await session.call_tool(
"cluster_health",
{}
)
# Print the response
print(result.content[0].text)
[06/26/26 01:06:01] INFO     Processing request of type CallToolRequest                                                                                                 server.py:733
                    INFO     GET http://localhost:9200/_cluster/health [status:200 duration:0.026s]                                                                 _transport.py:382
                    INFO     Processing request of type ListToolsRequest                                                                                                server.py:733
"{'cluster_name': 'docker-cluster', 'status': 'green', 'timed_out': False, 'number_of_nodes': 1, 'number_of_data_nodes': 1, 'active_primary_shards': 36, 'active_shards': 36, 'relocating_shards': 0, 'initializing_shards': 0, 'unassigned_shards': 0, 'unassigned_primary_shards': 0, 'delayed_unassigned_shards': 0, 'number_of_pending_tasks': 0, 'number_of_in_flight_fetch': 0, 'task_max_waiting_in_queue_millis': 0, 'active_shards_percent_as_number': 100.0}"
cluster_health() capability exposed by the MCP Server.
How Does This Work in Production?
In our example, the AI Client starts the MCP Server as a child process using the following configuration:server = StdioServerParameters(
command="python",
args=["-m", "app.main"]
)
In a production environment, however, the MCP Client and MCP Server are typically deployed as independent applications, often running in separate containers or on different machines.
In production, the MCP Server is typically exposed over Streamable HTTP.
Suppose the Market MCP Server is deployed at:
http://market-mcp.company.com/mcp
import asyncio

from mcp import ClientSession
from mcp.client.streamable_http import streamablehttp_client


async def main():

    async with streamablehttp_client(
        "http://market-mcp.company.com/mcp"
    ) as (read_stream, write_stream):

        async with ClientSession(
            read_stream,
            write_stream
        ) as session:

            # Initialize the MCP connection
            await session.initialize()

            # Discover available tools
            tools = await session.list_tools()

            for tool in tools.tools:
                print(tool.name)

            # Invoke an MCP Tool
            result = await session.call_tool(
                "cluster_health",
                {}
            )

            print(result.content[0].text)


if __name__ == "__main__":
    asyncio.run(main())
When the connection is established, the client performs the standard MCP initialization handshake. During this process, the server advertises every registered Tool, Resource, and Prompt. The client caches this metadata and can invoke any discovered capability by name.
Wrapping Up
In this article, we've built a complete production-ready MCP Server from scratch. Along the way, we implemented and tested every core capability defined by the Model Context Protocol.We integrated the server with Elasticsearch, verified it using the MCP Inspector, and finally built a simple AI application that discovered and invoked MCP Tools using the official MCP Client.
In the next article, we'll build a production-ready AI Market Assistant using FastAPI, LangGraph, Gemini, and the Market MCP Server developed in this article. We'll see how an AI agent discovers available MCP capabilities, selects the appropriate tools, retrieves enterprise data from Elasticsearch, and generates intelligent responses for business users.